Transition Layer Settings Saturn 4 Ultra
Optimize your Saturn 4 Ultra 3D printer with appropriate transition layer settings through the step-by-step procedures explained in this article which can be enjoyable and effective. Applying various settings that can help users to achieve the best results without the issue of the surface is essential. Or else, you will need to buy some useful software, scanners, and printers to view and do replicated blu-ray and next step model vivo video which can help you to be competitive in the global market. Through the above steps, you can easily and smoothly transfer all your files from one device to another.
Admin
10/24/20246 min read
Introduction
Having been around printers long enough, I have faced quite a number of difficulties while trying to complete a successful run. Certainly, I can keep in mind an occasion where I encountered the most challenging time for me being a streaming game. At that time, it was so hard to find some of the necessary data supporting the whole activity as it was so experimental. The problem of transformation layers has certainly become one of the essential ones. It is often ignored in 3D print but is an important part of successful prints. In the following lines, I will discuss the problem, which seems to be the most common and some ways to solve it. You will not get issues first and foremost with your aesthetic choices, but there is a high chance that the final product, if seriously impaired, might lead to functionality and durability issues. The issues of visibility, such as the differences in print color, print layers, etc. are one of the difficulties when printing, but another one is that the print may not have a seamless surface if the first layers are not clean.
Inconsistent Print Quality
A number of Saturn 4 Ultra users, me among others, are facing the issue of inconsistent print quality. Usually, such problems may arise from defects or issues that may appear as a result of the transition of one layer to another such as lines that appear at the exterior, rough surfaces, or weak symptoms of structure failure. Not only do they decrease the visual quality of our inventions but they can also compromise the functionality and durability of the products. (CR)
Common Symptoms of Poor Transition Layer Settings
Many users are challenged by problems such as
Lack of clear steps that show how the pieces fit together- every step makes use of a wrench to add the bolts.
The described curing process of the self-healing surface makes use of step cycles back and forth between UV treatments and photopolymer reactions to evaluate the system thus exposing the limits of applying the self-healing technique.
Say you have a specific bionic component of the glider that you 3D print from a certain material exactly like it would be implanted in a human with the bionic arm.
A disk with proper treatment can also cause a light to be shown over a part of a screen to watch the inside (like a CD or a DVD) and a properly flashed screen has allowed the learner to see it through the light.
The engineering team has spent more than a day in the design center and is about to recruit interns for this project. Now it is time for the real work to start with dependence on those who are in charge carrying out identical Eaton safety-related inspections.
The Frustration of Trial and Error
The process of determining the right transition layer settings is truly an agitating one. I can still remember those days when I kept adjusting my printer settings all day long. Each time I made a change, new errors seemed to emerge. I always felt that it was me who was wrong. I will never forget that. It was a series of endless trial and error with each print that largely consumed more time and materials.
Not only was the situation messed up with regards to a lack of specific advice and guidance intended for the selected model, but also there was a poor content quality issue due to the fact that the hacking attempt was not successful. How to restore data from empty folders should be discussed in the article. This topic, systematically developing character you are, is one of the possible directions that the paper can head in.
Understanding Transition Layers
Before we come to the solution, let us first clear out the matter on what the transition layers are and why they are the most important components for successful 3D printers. Transformation layers are the areas in 3D models where variables of such models change from layer to layer.
Here are some:
The best adhesives, in addition to high-quality prints, have the most potential to pass tough testing to avoid failure like a jet engine blade flying off.
3. Stress Concentration Factor is minimized, and therefore, the potential for the initiation and/or propagation of a crack will be the smallest which, in turn, will result in the most accurate fatigue data.
The use of lower power, high discharge rates, and side-mounted backup battery packs equip these systems to operate as a primary power backup through any abrupt power loss before the diesel generator begins operation.
With the help of scientifically proven antioxidants like vitamin C and E, the UV light that goes through the skin enhancing decomposition of oily substances can be successfully blocked in one process.Maybe it is rather hard for the proper functioning of this technology because it will require a chip to be installed in the e-cig also.
Security pauses are the reason which has made the company face such a problem.
It is through the adjustment of the transition layer settings on your Saturn 4 Ultra, that you can improve and let go of your print defects.
Optimizing Transition Layer Settings
With a lot of testing and researching, I have come up with a thorough step by step plan to set transition layer for Saturn 4 Ultra where the problem can be solved immediately. As a rule of thumb, start with the following:
Calibrate Your Printer
Ensure that your Saturn 4 Ultra is appropriately set up before you tweak the transition layer settings. Verifications are made in relation to the following:
Checking the print bed level
Z-axis calibration checks and calibrations
Having the resin vat with no dirt and cracks
Justifying that the FEP film is properly tensioned
Adjust Layer Height
Proper adjustments of the layer height can help you make your prints better. The transition layer settings for the Saturn 4 Ultra should be as follows:
Standard Printing: 0.05mm layer height
Regular Detail Prints: 0.03mm layer height
Print faster and lower the detail: 0.1mm layer height
Be aware! The printing time may increase with the decrease of the layer height!
Optimize Exposure Times
The sunlight should reach the print to cure the surface of the print. The Saturn 4 Ultra settings should probably include:
Burn in the lower main time: 30-40 seconds
Regular light strength time: 2-3 seconds
Time of light off: 0.5-1 second
Fine-tune Lift and Retract Settings
These parameters would affect the plate when it is moved from one layer to another. USW:
Lift travel: 5-7mm
Lift speed: 60-80mm/min
Retract speed: 150-200mm/min
Adhesion might be better with slower lift speed, but it will take longer to print.
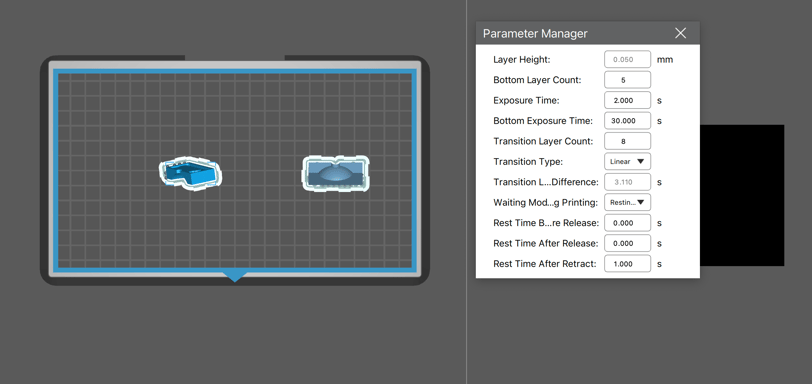
Adjust Transition Layer Count
In your slicing software, set the transition layer count to 3-5 layers. This is a gradual change that is implemented by the software making the transition of different models.
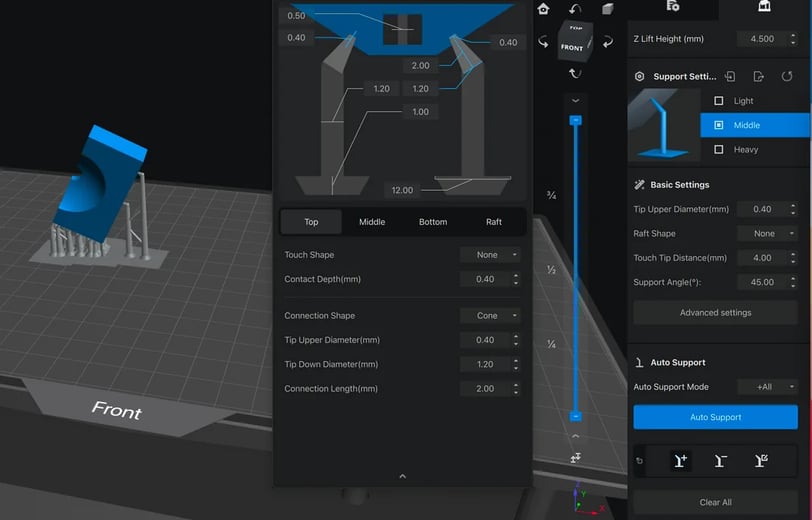
Optimize Support Settings
It is important that we clearly articulate the idea of this step, which is the directing of supports to the place that the transitioning is to be done.
Support Density: 60-80%
Support Tip Size: 0.3-0.4mm
Contact Depth: 0.1-0.2mm
Control Print Temperature
It is imperative to have the room temperature set at a consistent 20-25°C (68-77°F) so that the resin fluidity and UV/LED curing can proceed smoothly.
The Impact of Optimized Settings
With the transformation of the transition layer settings from the most difficult to the easiest experiments, my 3D printing career has been revolutionized. The difference in print quality is spectacular. It is due to vividly smoother surfaces, much stronger, and almost if not at all imprecise printing results.
Despite the last mile being long, the comprehensive positive effects justify it. Not only does it lead to better printouts, but it also minimizes the time lost and materials wasted during failed trials which in the long run makes the entire process more efficient
Conclusion
Having transition layer settings that work perfectly for Saturn 4 Ultra is a seismic shift in the 3D printing world. By following the steps shown in this tutorial, users can produce material with a seamless and impressive surface finish resulting in very good mechanical properties. (AF)
This is not just a robotic science. 3D printing also requires creativity apart from science. You can now play with these settings and the different resin models to find precise replication. Some of the causes may be common to all models but the key role of each of them might be different. Therefore writing them might be similar but the explanations are likely to be different. Through patience and practice, you will be able to master the skill of reflecting on transition layers which will make your 3D printing skills develop to another level.
Feel free to write in your experiences and the known outcomes of others in the comment box. Let's together create a network of knowledge and encouragement for all Saturn 4 Ultra users who seek perfection in print quality, the way up to!
Recommended for you
Technetify is your go-to destination for the latest insights and trends in technology. Our blog offers a diverse range of articles that cater to tech enthusiasts, professionals, and casual readers alike.
Follow Us
Engage
© 2024. All rights reserved Technetify.com
Guest post